Sunday, October 27, 2013
DAY OF THE DEAD OR DIA de MUERTOS PHOTO SHOOT
I love Day of the Dead. Or Dia de Muertos in Spanish. The little figures in the above photo are a gift from my sister that she purchased in New Mexico for me.
I think it's a pretty and thoughtful way for us to remember our beloved friends and family that have died.
I had posted on Facebook about how much I love it and was thrilled when professional photographer, Gayle Dawn Exton in Huntington Beach, asked if my girl scout troop would be willing to be her models for a Day of the Dead photo shoot.
I quickly answered yes. My girls were thrilled to get to have make up and photographs done for them too.
The girls each got to pick which look they wanted and what colors they wanted to be in. Then they received the outline of the mask.
At first they don't look nearly as pretty as the final product.
But, they still were having fun and loved seeing themselves with drawings on their face and wondering how it would turn out.
Then it was time to get the white part of the mask painted on.
It was funny to look over at them as lined up after having their mask painted white. It was coming together.
Once the color got painted on they looked great!
Each girl looked so pretty and different.
I loved looking over at them as waited for the last girl to be painted.
Once they were all finished being painted, they let their hair down and I got a chance to snap a few photos with my camera phone.
They loved being models for the night. The photographer was wonderful with them.
Her work came out beautiful. Look at this photo. Isn't it lovely!
Well, now look at it flipped upside down! A totally different look.
I loved being able to introduce the girls to what the Day of the Dead/Dia de Muertos is all about.
If you are in or near Huntington Beach I would highly recommend going to Gayle Dawn Exton for your photographs. You can find her on Facebook or by clicking here. She does great work.
Saturday, October 26, 2013
A BOOO-TIFUL HALLOWEEN PARTY
Martha wants to invite you to her 2013 Halloween party. It is going to be a Boo~tiful time.
The bats are flying overhead to show you the way.
The table is set with midnight black table cloth. On top of that is a silver/glittered spider place mat. A jet black plate is next and one of Martha's dear friends lent a hand and is holding the place cards so everyone knows where to sit.
Martha made little candy boxes to sit at each place sitting. These were made with boxes purchased at The Dollar Tree. A post about how they were made will be coming up in the next day or two.
These boxes were filled with Hershey Kisses. The silver wrapped chocolate went perfectly with her theme colors.
As another little treat to take home, each guest gets a black/glitter bag filled with homemade Candy Corn/White Chocolate bark.
Martha is forever looking for a great deal. While she was Michael's Craft store, months ago, she came across these bags in the clearance bin. She got them for only 50 cents! Not bad.
The cute silver spider not only makes the bags look cute, but they can also be turned into a necklace by putting a chain or ribbon though it. They were purchased on line from eBay.
The candy corn bark was super easy to make. Just get white chocolate, melt it and stir in candy corn. Poor onto a parchment line cookie sheet and spread it thin. Then sprinkle more candy can and let set.
Once it is hardened just break up into smaller pieces, put in a bag and you are done.
Did you notice the sweet little coffins at each place setting? These got blinged up a bit by putting some rhinestones on them and then filling them up with the best tasting bones.
Yes, you heard that right. These bones taste great. They are super easy to make, taste great and are perfect to go inside a coffin.
I'll do a post on how to make them shortly.
If you don't have little coffins to fill, they still look cute piled up in a dish.
White Martha really didn't start out with the theme of spiders in mind, it seems like her little pets crawled in her ear and kept whispering "silver spiders, silver spiders" because they kept showing up everywhere.
Even the glasses had a lovely silver spider web with a sparkly spider made out of rhinestones. They were found at TJ Maxx.
This photograph does not do these glasses justice. They are very pretty in person and only cost $3.99 each. What a bargain!
Oh I almost forgot, a few little tomb stones that were also found at the Dollar Tree finished out the final touches.
I hope you enjoyed this years Halloween party. It's time to get started on planning next years now.
Thursday, September 5, 2013
MAKE HOMEMADE PIES IN MINUTES
I love pies! Most people I know love pies too. Homemade pies are the best. Yet, I don't have the desire to take the time to make them.
That is until now!
I got a Breville Pie maker as a gift from my sister. I love it. I can now make pies in a matter of minutes.
I can also make different flavors for everyone.
It's so easy. I thought I would share with you just how easy it is.
You can make four mini pies at a time.
Just heat up the pie maker. While you are waiting for it to heat, roll and cut out your dough.
You can use your own dough, puff pastry or even store bought dough. For this example I used Pillsbury already made dough.
A cutter comes with the pie maker. I forgot to take pictures of me cutting out the dough. But, it's super simple. If you have a used a cookie cutter then you can do this.
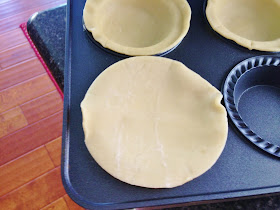
Place the cut out piece of pie dough over one of the spots in the pie maker.
Then push it into the cup area with the little "pusher" that is included with your pie makers.
You will now have the bottom part of your pies ready to be filled.
If your pie dough should rip in a spot or two, don't worry.
Just put a little piece of left over dough over the spot. You won't even notice it when the pie cooks.
Fill your pies with whatever filling you like. I canned some cherry pie filling a few months ago so I used that.
It says to put in 1/3 a cup of filling in. I don't measure it out. I just put enough in that it forms a little mound. You need the mound so the pie crust on top reaches the top of the pie maker. That way it cooks evenly.
Put the top layer of pie crust on top. No need to crimp it. The machine does that for you.
You can make all the same flavor or each pie could be different if you like.
Close the lid and make sure the handle locks. Then in a few minutes your pies will be finished. The booklet that comes with the machine says it takes around 10 minutes to cook.
I found that it doesn't take as long to cook. After about 4 minutes I open the machine up and check to see if the crust is cooked and golden brown. If it's not, I close the lid and let it cook longer. I check ever minute after that.
One thing that does not come with the machine is this pie lifter. I would highly recommend you get it. Otherwise, I fear it would be hard to get your pies out without always breaking.
With the lifter, they just lift right up.
So there you have it. In about 15 minutes you have your mini pies all made.
Clean up is a breeze too. You just whip out the machine. Nothing sticks to it.
If you need more pies, just start all over.
You can make tons of things with this pie maker. You can make things like a pot pie or even use bread rather then pie crust and fill it with meat and cheese for a sandwich. The sky is the limit as to what you can do with these.
There are other models and makers of the pie machine. You can get cheaper ones. I can't speak for the others but this one works better then I ever dreamed it would.
If you have any questions, let me know. I would be happy to answer them.
Wednesday, August 21, 2013
HOW TO CUT A PINEAPPLE QUICKLY
I love fresh pineapple. There is nothing like the biting into a juicy piece of pineapple.
Pineapples are also good for you.
But, if you are like me, cutting pineapples are a pain and it's easier to just use canned or already cut up pineapple from the store.
Well, not any more. I found the best way to cut a pineapple and it only takes a few minutes of your time.
First, cut off the top of your pineapple. Try not to cut off to much because you want to get all the good juicy fruit to eat.
I'm not a big kitchen gadget person. However, this is one gadget you will want to have!
It's a pineapple corer and slicer. It is the secret to cutting pineapples in a fraction of the time.
You can find these at most places that sell kitchen gadgets or on line.
This is what they look like. Pretty simple really. You can also get them made out of plastic but I would recommend the one made out of steel. I believe they will last longer and do a better job.
Line up the center with the core.
Then press down a bit so it goes into the pineapple. Then start to twist. It will cut into your pineapple with ease.
Keep twisting until you hit the bottom. If you go to far, it will cut the outside of the pineapple and that is fine. You just won't be able to use the outside as a bowl to put a fresh fruit salad in.
Once you hit the bottom, just pull up the pineapple. It's not hard to pull up either.
As you can see it cuts the pineapple perfectly so you don't have any eyes to deal with.
You can also see that it slices the pineapple into perfect slices.
You will now have a pineapple bowl that you can use to put a fresh fruit salad in, if you like. Just pull out the core.
I just toss it all out. However, if I was going to have a party where I was serving fresh fruit salad I would use it as a bowl. I think that look is so cute.
Just remove the pineapple from the gadget and you will have slices that are all the same size. Just like the ones you get from the cans...only these taste so much better.
I love to can food so I will can my pineapple in these rings from now on rather then spending time to cut the pineapple into chunks.
Hmmm, all this talk of pineapple makes me want to go eat some right now.
Did I tell you, clean up is super easy too?


